Setup Shared Mailbox Outlook For Mac
Setup Shared Mailbox Outlook For Mac Rating: 6,1/10 4410 reviews
This guide gives details on how to set up your Microsoft Outlook client to use your university Office365 email account. For Windows 7: Click Start > Control Panel > Mail. If Mail is not displayed you should change the ‘view by’ in the top right hand corner of the screen from ‘Category’ to either ‘Large’ or ‘Small’ icons. You should then be able to select Mail. For Windows 8: Select 'Settings' from the right edge of the screen.
The Settings pane will pop out and you can then choose 'Control Panel'. If Mail is not displayed you should change the ‘view by’ in the top right hand corner of the screen from ‘Category’ to either ‘Large’ or ‘Small’ icons. You should then be able to select Mail. Open Mail and the Mail dialogue box will appear. If you have not set up an email account with Outlook before, click ‘Add’ to add an Outlook profile. Specify a profile name, then skip to Step 4.
In the drop-down Open Other Mailbox window, enter the name of the shared mailbox. A new window will open and you will be working in the shared mailbox. Accessing a Shared Mailbox with the Outlook Client Outlook for Mac 2011/2016. While logged in to Outlook select Tools and then Accounts. To add another mailbox, launch Microsoft Outlook 2016 then click the File tab > click Info tab > Account Settings. In Account Settings, select your current Mailbox and click Change.
If you already have an account set up with Microsoft Outlook, then you will see a ‘Mail setup’ box. Select 'Email Accounts' and click 'New.' Select ‘Email accounts’ and click ‘Next.’ 4. You should now see the ‘Add new account’ screen.
Enter your name, full Exeter email address, Exeter password, and click ‘Next.’ If you are prompted for authentication, please enter your Exeter email address again, followed by your password. If connection is successful, you will see a ‘congratulations’ screen. Make sure you check the ‘ Manually Configure Settings’ box, and make sure ‘ Cached Exchange Mode’ is unticked (you should only tick this if you want to access Outlook offline on your uni laptop, but beware it can cause problems). Click ‘Finish’ to complete setup. When you open Microsoft Outlook, the program should load and your email should be ready to use. For more information see the full guide.
This guide gives details on how to set up Mac Mail to use your university Office365 email account. If your Mac Mail has been migrated from Exchange, please see the separate guide at These instructions are written for Mac OS X 10.10 (Yosemite), but the process will be almost identical for Mavericks (OS X 10.9) and Mountain Lion (OS X 10.8). If you are using an earlier version of Mac OS X than this, please consider upgrading as soon as possible. Open System Preferences - either from the Dock or from the Apple > System Preferences menu. 2. Click on Internet Accounts 3.
In the Internet Accounts panel, select Exchange from the list of account types. Enter your name, fulluniversity email address and password. You can also add a description such as 'Exeter University'. Click ‘ Continue’ and your Mac will start to search for your account. If you are prompted for further information, please note that the account type is Exchange, and the incoming mail server is outlook.office365.com. Finally, select whether you want to synchronise your Contacts and Calendars. Once you are happy with this, click ‘ Done.’ 8.
Export PATH=/usr/local/mysql/bin:$PATH Note: You will need to open a new Terminal window or run the command above for your path to update. Install graphite for mac os el capitan. Finally, you should run mysql_secure_installation.
Contribute to orbotix/Sphero-Mac-SDK development by creating an account on GitHub. This Guide walks you through the basics of creating Mac apps that leverage the Orbotix Sphero SDK. The examples in this guide were built using Objective-C and have been tested with the current released. This is the central app for Sphero and a required app for all Sphero owners. Use it to get rolling with Sphero Original or 2.0, upgrade firmware and personalize your gameplay like never before. AirPlay media streaming enables you to stream content from an iPhone or iPad to Mac OS X desktop or laptop. I recently bought Sphero 2.0 and playing with it on iPad with no problems. Now I want try to develop some apps with Mac SDK however I am not able to connect my Sphero with my Mac Mini 2012 nor. Sphero app for mac. Download and install Sphero in PC and you can install Sphero 5.3 in your Windows PC and Mac OS. Sphero is developed by fitfit.am and listed under Entertainment. Sphero APK file details: Best Android Emulators. Bluestacks & Nox App Player. Operating Systems. Windows 7,8/10 or Mac. Download Sphero Edu for macOS 10.9.0 or later and enjoy it on your Mac. Designed for learner progression, Sphero Edu beginners can give robots commands by drawing a path in the app for their robot to follow.
Open the Mail app either from the Dock, from Launch Pad or Spotlight. When the Mail app opens, check that the Exchange Inbox appears in the left-hand column of the window. Your mail should start synchronising and appear in the list view. Note that this process can take quite a while if you have a large number of messages, and that the messages will be transferred in batches. Your mail account should now be ready to use.
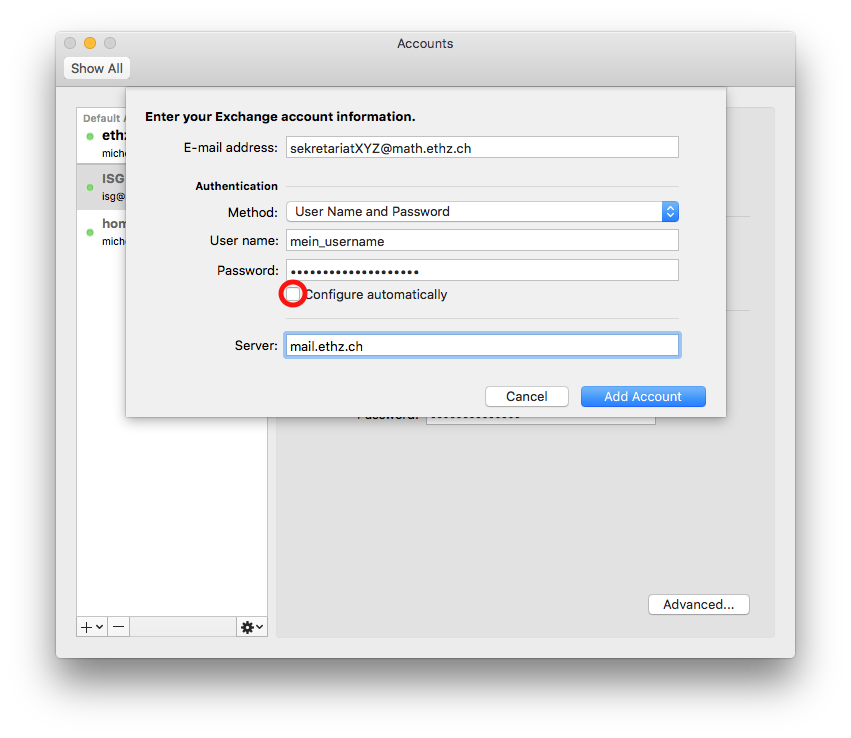
For more information see the full guide. This guide gives details on how to set up Outlook for Mac to use your university Office365 email account. From the desktop, click on the Outlook icon. If you have not set up an account previously, you will see a welcome screen, and should click ‘Add Account.’ If you already have an account set up when you open Outlook, you will need to choose 'Tools > Accounts' in the menu bar, and click the '+' sign (bottom left of the screen) to add an account. You may be asked which account you wish to set up. Please select ‘Exchange Account.’ Type in your Exeter email address and username fields (with the format: username@exeter.ac.uk), and put in your University password.
- воскресенье 27 января
- 23