How To Format Usb Mac For Linux Bootable On No Os
How To Format Usb Mac For Linux Bootable On No Os Rating: 9,1/10 8431 reviews
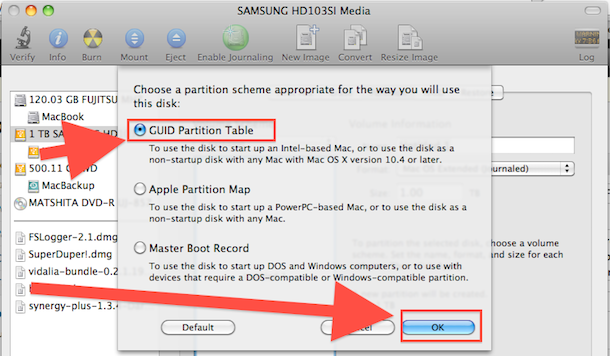
There are a few ways to get a create a live Linux USB drive that will boot on your. Mac emulator for windows. Give it a name (or not) and choose MS-DOS (FAT) under “Format” and GUID. But Mac OS X has its share of quality open source programs as well — and a. To reformat the USB drive, plug it in to your Mac and open the Disk Utility. Once open, find your USB drive and click on the drive itself (not a partition). Then click 'Erase'.

Before describing how to create a bootable USB drive read the article. In some cases described below, it is desirable to have already formatted the USB flash drive in FAT32 format. LinuxLive USB Creator (only for users) If you are a user of the Windows operating system and want to make a bootable USB flash drive with a distribution - this program is for you.
It is very simple, select the USB flash drive, please specify the iso image will be copied, turn on the option to format the USB stick and click on the lightning. You can download the program on the official developer's website. Rufus (only for Windows users) Rufus is a utility that helps format and create bootable Flash /Pen /Key drives, memory cards, etc. Rufus will be especially useful in cases where: -you need to create a bootable USB disk from a bootable ISO image ( Windows, Linux, UEFI, and others) -need to work on systems that have no OS installed -you need to flash a BIOS or other firmware from DOS -you need to run a low-level utility -Despite its small size, Rufus knows how to do everything! Best shooting games for mac. UNetbootin (for Linux, Windows, Mac users) A very common program.
The principle of operation is the same as the previous program. Select the image, select the flash drive, and click OK. For details, see the screenshots below. Official website Installation latest version into 14/15/16/17/17.1: sudo add-apt-repository ppa:gezakovacs/ppa sudo apt-get update sudo apt-get install unetbootin extlinux 4.
LiveUSB MultiSystem (for Linux users) - To create a bootable USB flash drive with multiple operating systems ( windows or linux ) read article. Either - program to burn the iso image with the distro on a USB flash drive or micro SD card (Windows, MacOS and Linux) read article 6. YUMI – Multiboot USB Creator (for Linux, Windows users) YUMI (Your Universal Multiboot Integrator), is the successor to our MultibootISOs. It can be used to create a Multiboot USB Flash Drive containing multiple operating systems, utilities, disc cloning, diagnostic tools, and more. Contrary to MultiBootISOs which used to boot ISO files directly from USB, YUMI uses syslinux to boot extracted distributions stored on the USB device, and reverts to using grub to Boot Multiple ISO files from USB, if necessary. Important Note: YUMI was intended to be used to try to run various 'LIVE Linux' Operating Systems from USB. Installing Linux from the YUMI created USB Drive to a Hard Drive is not officially supported.
If the installer portion of any Live Linux distro does work, consider it a bonus. Website Installation latest version into Linux Mint 14/15/16/17/17.1: Download DEB package ' YUMI for Ubuntu Linux' from website Install it. USB image writer (for Linux users) Linux Mint have default utility USB image writer.
One time I used this program, but personally I have not always made a bootable USB flash drive. Locate menu, the program will run. Select the image, select the USB drive and click Write. Multiboot USB flash drive designed for loading and installing operating systems Windows/Linux and restoration-resuscitation tools directly from the USB drive. Is a simple tool that allows you to create your own Windows installation on USB stick from an ISO image or DVD disk in Linux Mint.
Using the terminal ( in my opinion the best 100% of the way) As is known, the terminal is installed in any Linux distribution by default, so install additional software is not required. The terminal command to write the iso image, the distribution is as follows: sudo dd if=/home/USER/linuxmint.iso of=/dev/sdb Where instead of / home/USER/linuxmint.iso you need to specify the path to the iso file. Sdb in the end, it's a stick on which is written the way. Note about DD utility. The program is designed for byte copy data from one location to another.
- вторник 13 ноября
- 68