Manual Vpn Configuration For Mac
Manual Vpn Configuration For Mac Rating: 8,9/10 2583 reviews
If you want to learn about why you should use a VPN on your MacBook, iMac, or Mac Mini, please check out 5 Best. As its name would suggest, that article also recommendations some great VPN services to use with your Mac. Most VPN providers feature detailed Mac setup guides on their websites, but this article provides a general overview of how to install a VPN on your. Use a VPN’s custom Mac software macOS is not quite as well supported by custom VPN clients as Windows is, but most VPNs offer dedicated Mac software. As we shall see in a bit, manually configuring a VPN in MacOS is not hard, but using a custom VPN is just insanely easy.
For more information regarding the configuration of VPN connections in Chrome OS. PC or Mac) is the user email address entered in the Dashboard. The instructions below are tested on Mac OS 10.7.3 (Lion). Open System Preferences > Network from Mac applications menu.
Because of the custom nature of the software, setup details can vary a little from VPN to VPN. However, in general: • Register an account with one of the, see our guide for more information.
• Download its Mac software. • Install the app. This usually just involves double-clicking on the downloaded.dmg file and following instructions. • Run the app. You’ll likely be prompted to enter your account details on the first run. Note that it is normal for VPN apps to require admin privileges to run.
Once in the app, simply select a VPN server you wish to connect to, and hit “Connect.” It is worth, however, going through the app’s options. Important settings such as and are often optional and must be manually enabled. I have no idea why, but there you go. ExpressVPN’s “Network Lock feature provides a firewall-based kill switch and DNS leak protection. So do be sure it is turned on. You may also want to check that the app is using the OpenVPN protocol, as many default to less secure (but possibly faster) VPN protocols.
Pleases see for more information on VPN protocols. Tunnelblick VPN for Mac is a free and open source OpenVPN client that can be configured to work with either special Tunnelblick configuration files (.tblk), or any standard OpenVPN configuration files (.ovpn and.conf). It now includes full DNS leak and Web Real-Time Communication (WebRTC) leak protection. The latest beta client also features a firewall-based kill switch. Download Tunnelblick or regular OpenVPN configuration files from your chosen VPN service. You will need one file per VPN server location, although it's often possible to download multiple configurations in a single zip file. In this case, you'll need to unzip the files before they can be used.
2., install and launch Tunnelblick. On the Welcome screen, select “I have the configuration files.” 3. Drag the configuration file (or multiples files for multiple server configurations) to the Tunnelblick icon in the menu bar. Hit “Install,” then choose whether to install just for yourself or all users of your Mac. It will probably ask for your Admin password. And that’s setup done! To connect to a VPN server, click on the Tunnelblick icon in the menu bar and select a VPN server.
The icon will turn a darker shade to indicate that you are connected. If you hover the cursor over it, it will display additional information.
Addendum: Turn on DNS leak protection IPv4 and IPv6 DNS leak protection are not enabled by default in Tunnelblick. To enable DNS leak protection go to Configurations -> Settings and tick the boxes next to “Route all IPv4 traffic through the VPN” and “Disable IPv6.” Note that Tunnelblick does not protect against WebRTC leaks.
Best antivirus software for mac. If you just use your Mac for browsing the internet and checking email, then basic knowledge on what to click on and what not to click on should serve you well (if you're asked to install software you didn't download or KNOW it to be a virus, just walk away) but if you do online banking or do anything that involves sensitive information, you should install some sort of anti-virus software.
As such, you'll need to manually (Safari is not affected, anyway). Turning on kill switch on Mac New to the latest beta version of Tunnelblick is a very welcome kill switch feature. This ensures that your real Internet Protocol (IP) address is not exposed in the event of a.
To enable the kill switch, go to Configurations and click on the individual VPN configuration (the kill switch must be enabled for each configuration). Click on the “On unexpected disconnect” field and select Disable Network Access from the drop-down menu. Manually Configure VPN for Mac PPTP, L2TP/IPsec, or IKEv2 macOS comes with a built-in VPN client that supports the PPTP, L2TP/IPsec, and IKEv2. For reasons discussed in detail in, I always recommend using an OpenVPN app instead. But IKEv2 is also a good option.
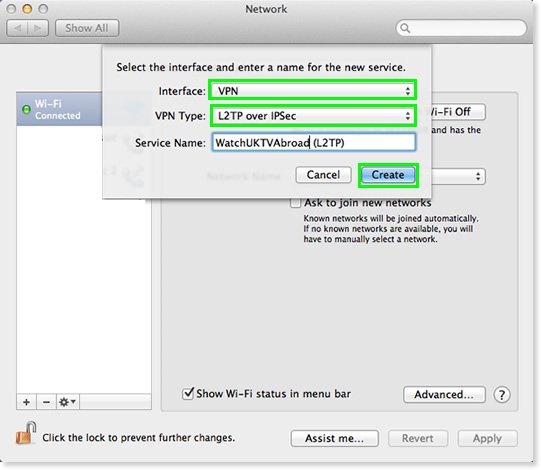
The big advantage of PPTP, L2TP/IPsec and IKEv2 VPN connection is that they can be setup without the need to download a third party VPN app. • Go to System Preferences -> Network. Click the + button and select Interface: VPN in the pop-up dialog box.
- среда 26 декабря
- 39