Making A Bootable Usb For Mac Os X Sierra
Making A Bootable Usb For Mac Os X Sierra Rating: 6,6/10 9849 reviews
Minecraft world edit commands 1.12. [command] Show a quick tutorial and description for that command. /worldedit reload: Reload the Worldedit's configuration. /worldedit version: Show the current Worldedit version being used. /worldedit tz: Set player's temporary time zone. //fast: Toggles fastmode performance for Worldedit but can decrease FPS rate for the player.
Virtual machine vmware for mac. MacOS Sierra, the first of the new macOS systems, includes the ability to create a bootable installer on a USB flash drive or on a drive you have connected to your Mac. The advantage of the ability to create a bootable installer of macOS Sierra can’t be overstated.
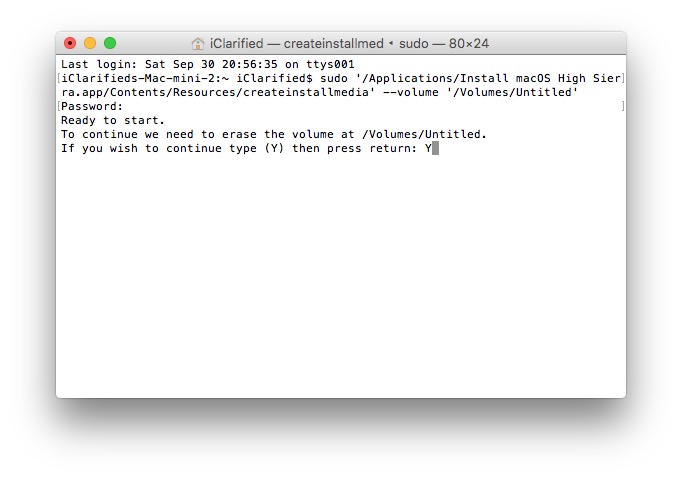
What's Hot at TechRepublic • • • • While the process of upgrading to macOS Sierra is pretty easy for consumers, IT administrators may have a more difficult time getting this update to all the end users they support. To facilitate this upgrade process, creating a bootable USB installer drive helps get this deployed quickly for SMB environments. IT admins for enterprise environments might look toward other distribution methods, such as DeployStudio. SEE: (TechRepublic) Requirements for creating a bootable drive • 8 GB USB flash drive (or SD card) • Install MacOS Sierra.app (the installer downloaded from the Mac App Store) • Apple computer with Mac App Store (10.6.8+) • User account with administrative privileges SEE: (TechRepublic) Creating a bootable USB installer for macOS Sierra. Insert the USB flash drive into a USB port and note the volume name of the drive as it is mounted to Finder. Launch Terminal.app and enter the following command to kick off the process of extracting the macOS Sierra files to the USB drive. Note: All data on the USB drive will be erased ( Figure A).
Sudo /Applications/Install macOS Sierra.app/Contents/Resources/createinstallmedia --volume /Volumes/USB_DRIVE_VOLUME_NAME --applicationpath /Applications/Install macOS Sierra.app --nointeraction Figure A.
Apple announced its latest version of the OS for Macs at this year’s WWDC, and as we all know it is called. While the final public release of the OS is still a few months away, the beta version of the OS is already up for grabs. Whether you are a registered Apple developer or someone who is interested in trying out beta versions of the OS, Apple has you covered. You can download the beta version of macOS Sierra from Apple’s website using either your developer account or an account that was enrolled for beta testing.

Once you have downloaded the OS, you will want to create a USB installer so that you can have a fresh-install of the OS on your machine. Creating a bootable macOS Sierra USB installer is as easy as running a few commands through Terminal. Here’s the entire process for downloading and creating a bootable USB installer.
Download the macOS Sierra Public Beta Installer Apple has made the public beta of the OS available for download on their website, and all you need to do is go there and log in with your account, and then click on the “macOS” tab followed by “Download” to start the OS download. The OS should be downloaded like an app from the Mac App Store and will take a while to finish downloading as it is sized at around 4GB. After it has been downloaded on your Mac, it should automatically launch for installation. At this point you need to close it by pressing the “Command + Q” key on your keyboard, as you are not going to install the OS this way. You are going to use a USB installer for the OS installation. Getting Your USB Drive Ready for the Installer You need to have a USB drive that has at least 8GB available on it. Also, the drive will be formatted, so make sure you back it up before proceeding.
- понедельник 10 сентября
- 67