How To Create Custom Paper Size In Word 2011 For Mac
How To Create Custom Paper Size In Word 2011 For Mac Rating: 5,8/10 8235 reviews
How to Set the Margins in Word 2011 – Mac: Click on the Layout tab. Under Margins, change the margin for all sizes top, right, bottom, & left to 1. How To Create a Header in Word 2011 – Mac: To create a header with your Last Name and automatic page numbering on the top of every page, follow these steps. Click on View. Click on Header. In Word, go to the Format menu, and select Document. You set the dimensions here, including Headers and Footers. Then go to Page Setup (at the bottom of this same menu) and make sure the correct paper size is selected.
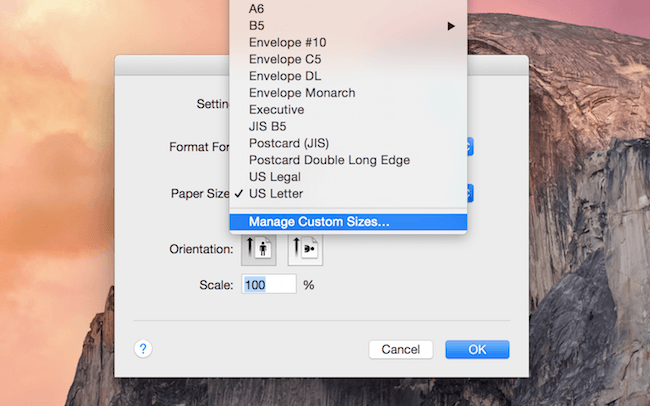
Here are instructions on how to format your book using Microsoft Word on a Mac. Interior templates are also available on, where you can download a template for your book’s specific measurements. US Trade For a 6″x9″ book, start by changing the paper size and the margins to match the dimensions of a US Trade, 6″ x 9″ book (these instructions are applicable to whatever book trim size you choose). Start by double-clicking on the ruler at the top of your document and bring up the document formatting window. Click on the “Margins” tab, then the “Page Setup” button. Click on “Paper Size,” then “Manage Custom Sizes.” Make a new dimension by clicking on the “plus” button, and name it “US Trade.” The paper size is actually going to be 6.25″ x 9.25″ to accommodate for the image bleed that Microsoft Word does not take into consideration.
As a business, how do you get started using QuickBooks? By setting up a new company file, which houses all transactions for customers, vendors,. Software as a service, or SaaS, is a software delivery model that hosts business applications on the cloud. 5.6 million businesses use QuickBooks. If you are a small business owner in an industry where you have options when pricing your products and services, then you may have heard about. '\'quickbooks for mac\' company setup industry saas'. Review of QuickBooks for Mac Software: system overview, features, price and cost information. QuickBooks provides Mac-specific features. For example, users can embed a notification bar in Quickbook experience in law industry. I would use this for a very small business that doesn't need a. Tutorial on setting up companies in QuickBooks for Mac. Choose your industry type as shown in screen below. Custom checkmarks will be allocated based on your industry type; you can check and uncheck to suit your business needs or leave as is to customize later.
Image bleed allows images or colors to go to the edge of a page. When you print a book using commercial presses, it is essential to include this extra space beyond the trim line. (For more information, watch our “” tutorial.) Once it’s set to 6.25″ x 9.25″, adjust the margins. For the top and bottom, set it to 0.44 inches and click “OK.” For the left and right, set it to one inch. You can increase gutter in middle if you’d like to have a larger space running down where your book is bound. Make your header and footer 0.5″ or 0.44” to match the top and bottom print margins. Check “mirror margins” to set your book up like a printed book spread.
Chapters Next, click the “Layout” tab. If you would like your chapters to all start on a right hand page, set each chapter as a new section break, and set those new sections to start on an odd page. For headers and footers, select the “different odd and even” option if you want to have an author name on one side and the title of the book or chapter name on the other side. Select “different first page” if you don’t want to have your headers at the beginning of each chapter. Microsoft publisher for mac free download.
Now click “OK” to apply the changes to the whole document. The page size is now set to U.S. Trade 6″ x 9″ as opposed to the 8.5″ by 11″ you probably started out with. Basic formatting Let’s continue with some basic formatting. Turn on “show all non-printing characters” to help you identify what type of breaks you are using. Assuming you have the text of your book and your chapters defined, you will want to include a title page and a copyright page for the year of publication. Do not hit the enter button several times to create a new page.
Instead, go to “Insert > Break > PageBreak” to define a break in the page. Now, you can design a title page. Type in your book title and increase the font size. Bring it down to about the middle of your first page. This will print as our right-side title page when you first open your printed book. (For more information on how a printed book is laid out, please watch our “” tutorial.) Now, add your copyright information to be on the backside of that title page.
That will be on page two, so insert another page break. Include the publication year and anything else you would like to list.
Copyright information is typically down at the bottom of the page. Next, insert a “Section break” (we recommend the “next odd page”), then highlight the chapter text. Click on the formatting style in the formatting palette or at the top of your document and select “Heading.” Now this will be defined as a “Chapter Heading.” Go ahead and find where you designated chapter 2 and repeat the same instructions as before: insert a “section break odd page” and mark the chapter text as a “Heading.” Table of Contents and more After your Copyright page, insert a “section break.” Then, go to the “Insert” dropdown, select “Table of Contents,” pick a style, and insert it. Now you’ll see a “Table of Contents” list with page numbers.
- суббота 08 декабря
- 74