Disassmble Wd Passport For Mac
Disassmble Wd Passport For Mac Rating: 7,2/10 9574 reviews
My Passport for Mac is trusted, portable storage that perfectly complements your on-the-go lifestyle. Designed to fit in the palm of your hand, theres plenty of space to store a massive amount of photos, videos, music and documents. Perfectly paired with Apples Time Machine backup software and password protection, the My Passport for Mac drive helps keep your files safe. Western Digital My Passport for Mac 4TB Portable External Hard Drive: • Designed for Mac and Time Machine ready • Password protection with hardware encryption • Trusted drive built with WD reliability • USB 3.0 port; USB 2.0 compatible • 3-year limited warranty Reviews • This is my second WD passport external hard drive. This one looks sleeker than the last one.
Easy to set up and easy to use. • Plug-in ready for Mac. Easy way to back up everything on my computer. • I was hesitated between this item and Seagate 4T Slim in the beginning.
The seagate one is smaller and cheaper, but I chose this one because of the “encryption” function as it advertised. It turned out, you have download and pay additional money for a software for the encryption! Other than that, it works fine.
• I bought this USB 3.0 2 terabyte drive to replace a USB 2.0 1 terabyte external drive that was using for a Time Machne drive on my Mac. I plugged the new drive in — I didn’t even bother installing the utilities — and it was recognized immediately by the Mac. Getting it to “adopt” my old Time Machine backups was straightforward but painfully slow. I would attribute that to my old drive being USB 2.0 but also the huge number of files. Save yourself grief: don’t use “Finder” to copy the files, use “Super Duper!” instead. Still, expect that it could take 30+ hours to migrate a terabyte of backup files. Once it finished, I told Time Machine to use the new drive and it’s worked like a charm ever since.
WD 4TB Black My Passport for Mac Portable External Hard Drive - USB 3.0 - Model WDBP6A0040BBK-WESN Product - WD 2TB My Passport X for Xbox One Portable External Hard Drive - USB 3.0 - WDBCRM0020BBK-NESN.
Now what I don’t like: the white drive activity LED on the drive can either be OFF or it can be blinking. I would prefer a true activity indicator, and maybe a choice of colours (tricolour LEDs are cheap).
The utilities on the drive were much newer than what Western Digital had online. The utilities are quite limited in what they can set. Other than that, I’m very pleased with it. And Walmart was by far the least expensive place to buy it. • I used this for my PC and Mac and does it’s job. USB 3.0 and works like a charm. Would recommand to anyone.
Don’t buy the “mac” version the default still works with the mac for a lower price. • This external hardrive does not work as well as the Maxtor I owned before. Ever since using it I have had an error message regarding it when closing down my laptop and when I go to “safely” disconnect the device after backing up files it acts like the device is still being used. Something is not working like it should.
Reasons for opening up your device: One of the main reason you may need to open up your device is because it might be in need of repair. Other reasons could be you want to see how things are setup on the inside or you intend to change the external housing of the drive.
Whatever may be the reason this tutorial will show you how to open your Western digital My Passport external. What you will need? To open up your external Hard drive you will need: 1. A plastic pic or credit card like prying tool. How to open a Western Digital My Passport external Hard drive? To open up your external Hard drive: 1.
Turn the My Passport external drive right side up. Get the a plastic credit card like prying tool and carefully get it into the grooves of the drive.
The groves are towards the top of the drive. It may seem hard to get the tool into the groves of the drive but it can be done. 3. Android simulator on mac. When the tool gets into the groves slide it along the edges all around the drive. The plastic clips will fly and the top will come right off. There are no screws, the whole thing is held together by clips. Carefully slide the drive out and hold it by the edges and avoid shocks as it may damage the drive. That’s it the drive is now out, you can do what need to be done to the device now.
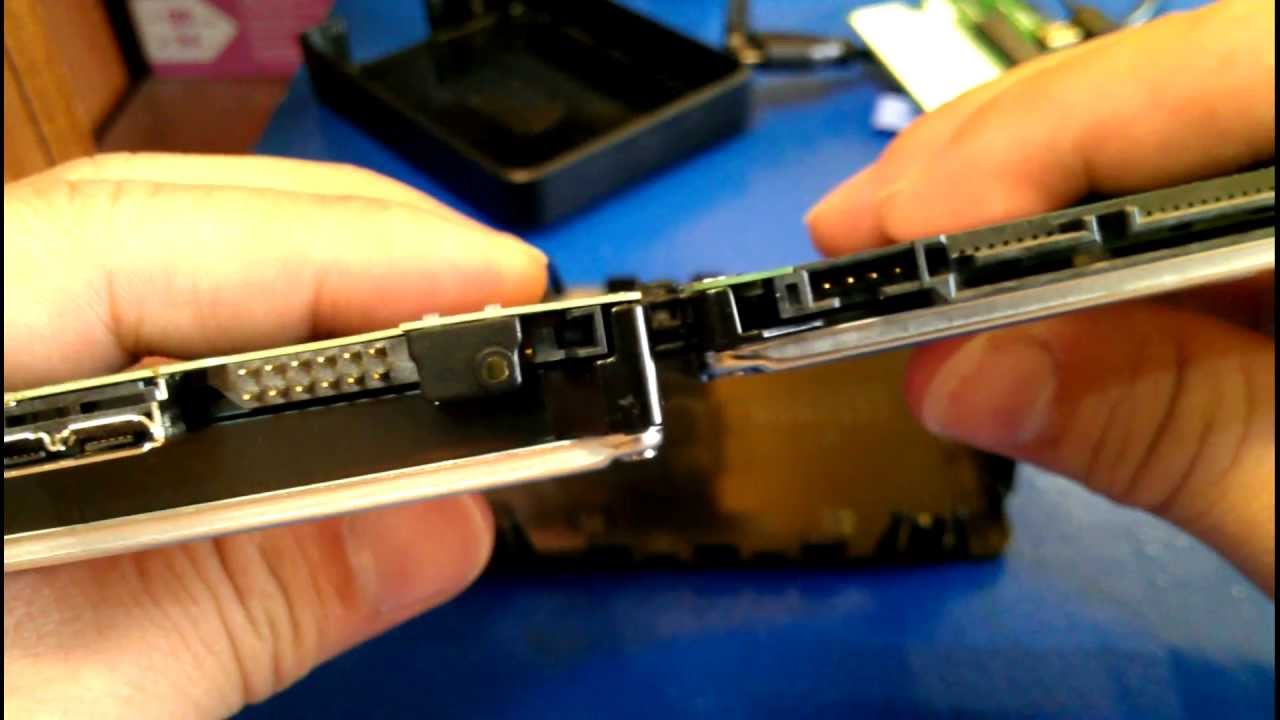
Do note that these drives are not regular Hard drive that have a SATA connection and as a result they won’t work in Laptops or can be replaced by those drives. These drives have special connections such as in the case of this My passport Ultra that was used for this tutorial had a USB 3.0 connection where the SATA connection should have been which means these drives can only be used in these external drives.
- среда 06 февраля
- 55